
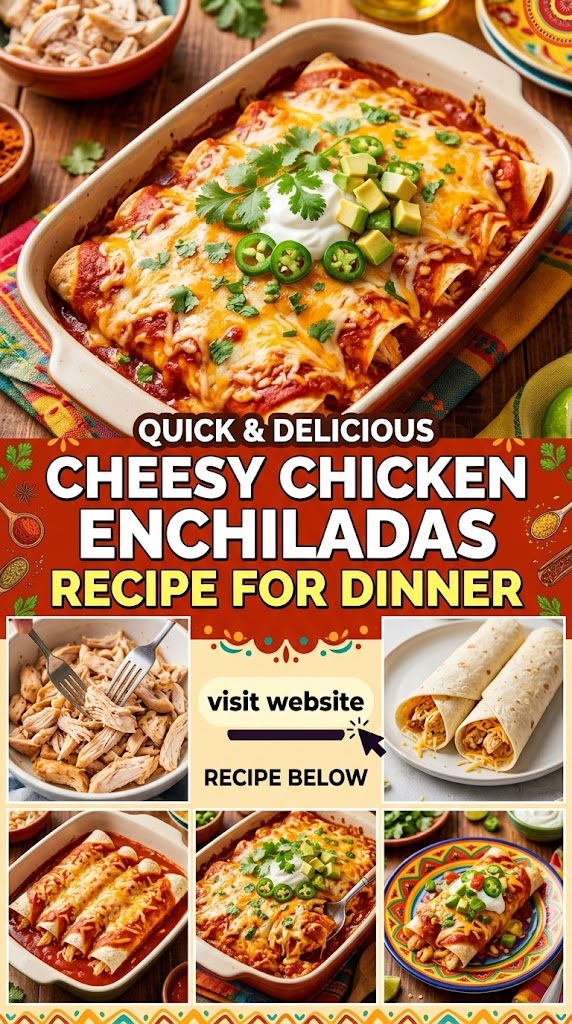
There is something universally comforting about a tray of bubbling, golden-brown cheese resting atop soft tortillas stuffed with savory, shredded chicken and drenched in a rich, smoky red sauce. Cheesy chicken enchiladas are more than just a meal; they are a centerpiece for family gatherings, a reliable weeknight staple, and a crowd-pleasing favorite that bridges the gap between traditional Mexican flavors and heartland American comfort food.
In this comprehensive guide, we are going to dive deep into the art of the perfect enchilada. We will cover everything from the history of this iconic dish to the science of the perfect cheese melt, and of course, provide a step-by-step recipe that will make you the hero of your kitchen. Whether you are a seasoned home cook or a beginner looking for a “can’t-fail” dinner, this guide is designed to help you master the cheesy chicken enchilada.
The History and Evolution of the Enchilada
The word “enchilada” is the past participle of the Spanish word enchilar, which literally means “to season with chili.” Historically, the practice of wrapping food in tortillas dates back to the time of the Aztecs in the Valley of Mexico. They would fold corn tortillas around small fish or vegetables and dip them in chili sauces.
As the dish migrated across borders and through generations, it evolved. In the United States, particularly in the Southwest, the “Tex-Mex” style emerged. This version popularized the use of heavy amounts of melted cheese (like yellow cheddar or Monterey Jack) and the use of flour tortillas alongside the traditional corn. Today’s cheesy chicken enchiladas represent a beautiful fusion of these traditions—combining the ancient use of chili-based sauces with the rich, indulgent ingredients modern diners love.
Why This Recipe Works
Before we get into the ingredients, it is important to understand what makes a “great” enchilada versus a “good” one. A great enchilada has:
- Balance of Texture: The tortillas should be soft but not mushy. They should hold their shape when lifted from the pan.
- Depth of Flavor: The sauce shouldn’t just be spicy; it should be earthy, smoky, and slightly acidic to cut through the richness of the cheese.
- The Perfect Fill-to-Tortilla Ratio: No one wants an enchilada that is all bread and no meat, or one that falls apart because it’s overstuffed.
- The Cheese Factor: Using the right blend of cheeses ensures a gooey pull and a toasted top.
Choosing Your Ingredients: The Deep Dive
The Chicken: Rotisserie vs. Poached vs. Pan-Seared
The protein is the heart of your filling. While you can use any cooked chicken, each method offers a different profile:
- Rotisserie Chicken: The “cheat code” for busy weeknights. It is pre-seasoned, tender, and easy to shred. This is highly recommended for those who want a 30-minute meal.
- Poached Chicken Breasts: Poaching in a broth with garlic, onion, and bay leaves results in a clean, lean flavor that lets the enchilada sauce shine.
- Slow Cooker Thighs: Using chicken thighs cooked low and slow in a bit of salsa results in the most succulent, flavorful filling possible.
The Tortillas: Corn or Flour?
This is often a point of debate.
- Corn Tortillas: These are traditional. They offer a distinct nutty flavor and a firmer bite. However, they can crack if not handled correctly.
- Flour Tortillas: These are common in Tex-Mex cooking. They are easier to roll and result in a softer, almost “burrito-lite” texture. They are perfect for those who prefer a more doughy, comfort-food feel.
The Cheese: The Science of the Melt
Not all cheeses are created equal. For the ultimate cheesy chicken enchiladas, you want a blend:
- Monterey Jack: Excellent melting properties and a mild flavor.
- Sharp Cheddar: Adds a bold, tangy kick.
- Queso Quesadilla or Oaxaca: For that professional-grade “cheese pull.”
- Avoid Pre-Shredded Bags (if possible): Pre-shredded cheese is coated in potato starch or cellulose to prevent clumping. This prevents it from melting into a smooth, cohesive layer. Grating your own cheese from a block makes a massive difference in quality.
The Recipe: Step-by-Step Cheesy Chicken Enchiladas
Ingredients List
For the Enchiladas:
- 3 cups shredded cooked chicken (rotisserie or home-cooked)
- 2 cups shredded Monterey Jack cheese (divided)
- 2 cups shredded Sharp Cheddar cheese (divided)
- 10-12 medium-sized flour or corn tortillas
- 1 small white onion, finely diced
- 2 cloves garlic, minced
- 1 tablespoon olive oil
- 1 can (4 oz) diced green chiles (optional, for a kick)
- 1/2 cup sour cream (mixed into the filling for extra creaminess)
- 1 teaspoon ground cumin
- Salt and pepper to taste
For the Homemade Red Sauce (The Secret Sauce):
- 2 tablespoons vegetable oil
- 2 tablespoons all-purpose flour
- 1/4 cup chili powder (use a mild one if sensitive to heat)
- 1/2 teaspoon garlic powder
- 1/2 teaspoon onion powder
- 1/4 teaspoon dried oregano
- 2 cups chicken broth
- 1 tablespoon tomato paste
- Salt to taste
Phase 1: Preparing the Red Enchilada Sauce
While store-bought sauce works in a pinch, making it from scratch takes 10 minutes and elevates the dish significantly.
- Create a Roux: In a medium saucepan over medium heat, add the oil and flour. Whisk together for 1-2 minutes until it starts to smell slightly nutty.
- Add Spices: Stir in the chili powder, garlic powder, onion powder, and oregano. Cook for 30 seconds to “bloom” the spices and release their oils.
- Whisk in Liquid: Slowly pour in the chicken broth while whisking constantly to ensure no lumps form. Stir in the tomato paste.
- Simmer: Bring to a light boil, then reduce heat and simmer for 5-8 minutes until thickened. Season with salt. Set aside.
Phase 2: Preparing the Chicken Filling
- Sauté: In a large skillet, heat olive oil over medium heat. Add the diced onions and cook until translucent (about 5 minutes). Add the minced garlic and cook for another minute.
- Combine: In a large mixing bowl, combine the shredded chicken, the sautéed onion and garlic, the diced green chiles, 1 cup of the mixed cheese, the sour cream, and the cumin.
- Moisten: Add about 1/4 cup of your homemade enchilada sauce to the chicken mixture. This ensures the inside isn’t dry. Season with salt and pepper.
Phase 3: Assembling the Enchiladas
- Prep the Pan: Preheat your oven to 375°F (190°C). Spread about 1/2 cup of the enchilada sauce on the bottom of a 9×13 inch baking dish. This prevents the tortillas from sticking.
- Softening Tortillas: If using corn tortillas, microwave them in a damp paper towel for 30 seconds or lightly fry them in oil for 5 seconds per side. This makes them pliable so they don’t crack. Flour tortillas usually don’t need this step but can be warmed for easier handling.
- The Roll: Place a generous portion of the chicken mixture in the center of a tortilla. Roll it up tightly and place it seam-side down in the baking dish.
- Crowd Them In: Pack the enchiladas tightly together. This helps them retain moisture during the baking process.
Phase 4: Topping and Baking
- Sauce it Up: Pour the remaining enchilada sauce evenly over the top of the rolled tortillas. Make sure the edges are covered so they don’t get too crunchy.
- Cheese Blanket: Sprinkle the remaining 3 cups of cheese over the top.
- Bake: Place in the oven and bake for 20-25 minutes. You are looking for the sauce to be bubbling and the cheese to be completely melted and starting to brown in spots.
- Broil (Optional): If you like a crispy cheese crust, turn the broiler on for the last 2 minutes, watching closely so it doesn’t burn.
Pro Tips for the Best Results
How to Prevent “Soggy” Enchiladas
One of the biggest complaints with homemade enchiladas is that they become mushy. To prevent this:
- The Oil Dip: For corn tortillas, quickly dipping them in hot oil before filling creates a barrier that prevents the sauce from soaking too deeply into the grain.
- Don’t Over-Sauce: While it’s tempting to drown them, you only need enough to cover the surface.
- Bake Uncovered: Baking uncovered allows excess moisture to evaporate, giving you a better texture.
Shred Your Own Chicken
If you have the time, poach chicken breasts in water with half an onion, cloves of garlic, and a pinch of salt. Once cooked, use a hand mixer or two forks to shred the meat while it’s still warm. Warm meat absorbs the flavors of the spices and sauce much better than cold meat.
Let it Rest
When you take the pan out of the oven, wait 10 minutes before serving. This allows the sauce to thicken and the cheese to set, making it much easier to lift a whole enchilada out of the pan without it falling apart.
Flavor Variations to Try
Once you have mastered the classic red cheesy chicken enchilada, you can start experimenting with these popular variations:
1. Enchiladas Verdes (Green Sauce)
Instead of a red chili-based sauce, use a salsa verde made from roasted tomatillos and green serrano peppers. This version is usually tangier and slightly lighter. It pairs exceptionally well with Monterey Jack cheese and a drizzle of Mexican Crema.
2. Creamy White Sauce Enchiladas
Often called “Enchiladas Suizas” style (though traditionally Suizas involve a creamy green sauce), the Americanized version uses a white sauce made from butter, flour, chicken broth, and sour cream. It is incredibly rich and decadent.
3. Veggie-Boosted Filling
Add black beans, roasted corn, or sautéed spinach to the chicken filling. Not only does this add nutritional value, but it also provides a variety of textures that make the dish more interesting.
4. Low-Carb/Keto Enchiladas
Swap the tortillas for thin slices of zucchini or use “egg wraps” or low-carb flour tortillas. Use a sugar-free enchilada sauce to keep the carb count low while maintaining all that cheesy goodness.
What to Serve with Cheesy Chicken Enchiladas
To turn this into a full Mexican-inspired feast, consider these side dishes:
- Cilantro Lime Rice: The acidity of the lime cuts through the richness of the cheese.
- Refried Beans: A classic staple. Top them with a little bit of Queso Fresco.
- Mexican Street Corn (Elote): Charred corn on the cob slathered in mayo, chili powder, and cotija cheese.
- A Simple Garden Salad: Use a vinaigrette with cumin and lime to provide a refreshing contrast to the heavy main dish.
- Guacamole and Chips: No dinner is complete without fresh avocado smashed with lime, salt, onion, and cilantro.
Storing, Freezing, and Reheating
One of the reasons cheesy chicken enchiladas are so popular in the USA is that they are perfect for meal prep.
Refrigerating
Leftover enchiladas will stay fresh in an airtight container in the refrigerator for up to 3-4 days. In fact, many people argue they taste better the next day as the flavors have more time to meld.
Freezing (Unbaked)
You can assemble the enchiladas in a freezer-safe foil pan, cover them tightly with plastic wrap and then aluminum foil, and freeze for up to 3 months.
- To Bake from Frozen: Do not thaw. Remove the plastic wrap, replace the foil, and bake at 375°F for 45 minutes. Remove the foil and bake for another 15 minutes until the cheese is bubbly.
Reheating
To keep the tortillas from getting tough in the microwave, place a small cup of water in the microwave with the plate. This creates steam. Alternatively, reheat in the oven at 350°F for 10-15 minutes to maintain the texture of the cheese.
Troubleshooting Common Issues
“My tortillas always break when I roll them!”
This is usually a temperature issue. Tortillas (especially corn) are brittle when cold. Make sure they are steaming hot when you roll them. If they still break, try using flour tortillas, which are much more forgiving.
“The sauce is too bitter.”
Sometimes chili powder can have a bitter aftertaste. If your sauce tastes off, add a teaspoon of sugar or honey. The sweetness will balance the bitterness of the dried peppers.
“The dish is too salty.”
Between the cheese, the canned chiles, and the chicken broth, salt can sneak up on you. Always use “low-sodium” chicken broth for the sauce so you can control the salt level yourself.
The Ultimate Topping Bar
Half the fun of eating enchiladas is the toppings! Set out bowls of the following so everyone can customize their plate:
- Sour Cream or Greek Yogurt: For a cool, creamy finish.
- Fresh Cilantro: For a burst of herbal freshness.
- Pickled Red Onions: These add a bright pink pop of color and a sharp vinegary bite.
- Sliced Jalapeños: For those who want more heat.
- Diced Avocado: For extra creaminess.
- Fresh Lime Wedges: Squeezing fresh lime over the top right before eating awakens all the other flavors.
Frequently Asked Questions (FAQs)
Can I use beef instead of chicken? Absolutely. Ground beef seasoned with taco spices or shredded chuck roast works beautifully with this red sauce and cheese combo.
Is enchilada sauce the same as taco sauce? No. Taco sauce is usually tomato-based and thinner. Enchilada sauce is traditionally made from a roux and chili powder (or rehydrated dried chilis) and has a deeper, more complex flavor profile.
Can I make this dairy-free? Yes. Use a vegan cheese shred that melts well and swap the sour cream in the filling for a dairy-free alternative or extra enchilada sauce.
What is the best baking dish for enchiladas? A ceramic or glass 9×13 inch baking dish is ideal. They distribute heat evenly and are deep enough to hold the sauce and cheese without overflowing.
Conclusion: Bringing the Restaurant Experience Home
Mastering the cheesy chicken enchilada is a rite of passage for any home cook who loves bold flavors and hearty meals. By taking the time to make your own sauce, choosing the right blend of cheeses, and following the proper assembly techniques, you can create a meal that rivals any Tex-Mex restaurant.
This dish is a celebration of texture and taste—the soft tortilla, the succulent chicken, the smoky sauce, and the indulgent melted cheese. It’s a recipe that invites conversation around the dinner table and leaves everyone reaching for seconds. So, grab your apron, shred that cheese, and get ready to serve the best dinner of the week. Your family will thank you!